Get Started With Remix.run
Remix is an excellent framework that allows you to easily collocate data loading and mutation server-side logic with your client-side code. Let's have some fun by creating a simple blogging app. You'll see how effortless it is to build a fully secure application with Remix and ZenStack combined.
You can find the final build result here.
Requirements
Our target app should meet the following requirements:
- Email/password-based signin/signup.
- Users can create posts for themselves.
- Post owners can update/publish/unpublish/delete their own posts.
- Users cannot make changes to posts that do not belong to them.
- Published posts can be viewed by all logged-in users.
Let's get started 🚀.
Prerequisite
- Make sure you have Node.js 18 or above installed.
- Install the VSCode extension for editing data models.
Building the app
1. Create a new project
The easiest way to create a Remix project with boilerplates is with create-remix. Run the following command to create a new project. When prompted, choose the following:
- Typescript or Javascript? Typescript
- Do you want me to run
npm install? Yes
npx create-remix@latest --template remix-run/indie-stack my-blog-app
cd my-blog-app
npm run dev
If everything works, you should have a running Remix app at http://localhost:3000.
Now sign up for a new account to continue.
2. Initialize the project for ZenStack
Let's run the zenstack CLI to prepare your project for using ZenStack.
npx zenstack@latest init
The command installs a few NPM dependencies. If the project already has a Prisma schema at prisma/schema.prisma, it's copied over to schema.zmodel. Otherwise, a sample schema.zmodel file is created.
Moving forward, you will keep updating schema.zmodel file, and prisma/schema.prisma will be automatically generated from it.
3. Prepare the Blog model
The template project already contains a Note model. Let's repurpose it to be a Post model. Rename it from Note to Post, and add a published field to store if the post is published or not. Also add access control rules with @@allow attribute to authorize requests.
model Post {
  id String @id @default(cuid())
  title String
  body String
  published Boolean @default(false)
  createdAt DateTime @default(now())
  updatedAt DateTime @updatedAt
  user User @relation(fields: [userId], references: [id], onDelete: Cascade, onUpdate: Cascade)
  userId String @default(auth().id)

  // author has full access
  @@allow('all', auth() == user)

  // logged-in users can view published posts
  @@allow('read', auth() != null && published)
}
The "userId" field as a @default() attribute with auth().id value. The field will be automatically assigned with the current user's ID when creating a new record. See here for more details.
By default, all operations are denied for a model. You can use the @@allow attribute to open up some permissions.
@@allow takes two parameters, the first is operation: create/read/update/delete. You can use a comma separated string to pass multiple operations, or use 'all' to abbreviate all operations. The second parameter is a boolean expression that verdicts if the rule should be activated.
Similarly, @@deny can be used to explicitly turn off some operations. It has the same syntax as @@allow but the opposite effect.
Whether an operation is permitted is determined as follows:
- If any
@@denyrule evaluates to true, it's denied. - If any
@@allowrule evaluates to true, it's allowed. - Otherwise, it's denied.
Check out Understanding Access Policies for more details.
Also we need to rename the relation in the User model from notes to posts.
model User {
  id String @id @default(cuid())
  email String @unique
  createdAt DateTime @default(now())
  updatedAt DateTime @updatedAt
  password Password?
  posts Post[]
}
Now let's regenerate schema.prisma and push schema changes to the database:
npx zenstack generate && npx prisma db push
4. Clean up unused files
Remove a few files and folders that are not needed anymore:
- /app/models/note.server.ts
- /app/routes/note.tsx
- /app/routes/notes
5. Build up the blog homepage
First add a helper method to /app/db.server.ts to get an access-policy-enabled prisma client. We'll use this wrapper to manipulate the Post model.
import { enhance } from '@zenstackhq/runtime';

export function getEnhancedPrisma(userId: string) {
    return enhance(prisma, { user: { id: userId } });
}
Create /app/models/post.server.ts with the following content:
import type { User } from '@prisma/client';
import { getEnhancedPrisma } from '~/db.server';

export function getPosts({ userId }: { userId: User['id'] }) {
    return getEnhancedPrisma(userId).post.findMany({
        orderBy: { updatedAt: 'desc' },
    });
}
Notice that we don't need to filter the posts by user id? Still at runtime, only posts belonging to the current user will be returned. This is because of the access policy we previously defined in the Post model.
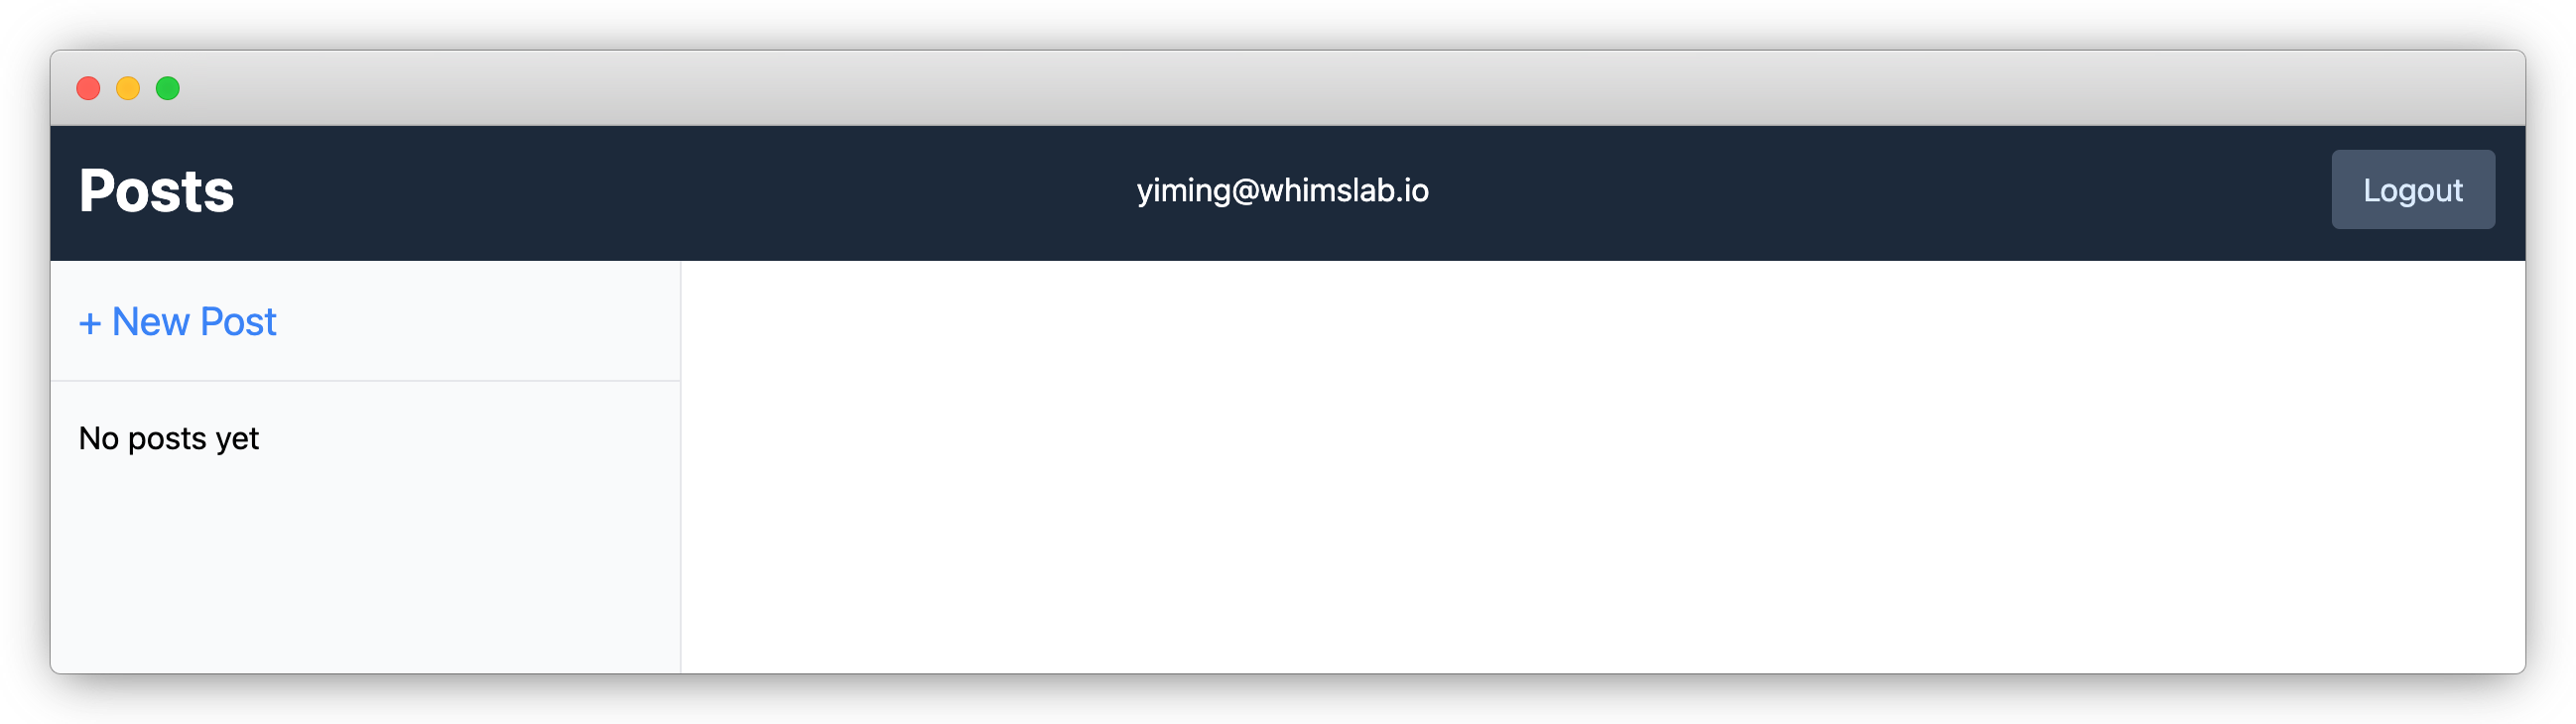
Let's create a new page at /app/routes/posts.tsx for listing and managing our blog posts.
import type { LoaderArgs } from '@remix-run/node';
import { json } from '@remix-run/node';
import { Form, Link, NavLink, Outlet, useLoaderData } from '@remix-run/react';
import { getPosts } from '~/models/post.server';
import { requireUserId } from '~/session.server';
import { useUser } from '~/utils';

export async function loader({ request }: LoaderArgs) {
    const userId = await requireUserId(request);
    const posts = await getPosts({ userId });
    return json({ posts });
}

export default function PostsPage() {
    const data = useLoaderData<typeof loader>();
    const user = useUser();

    return (
        <div className="flex h-full min-h-screen flex-col">
            <header className="flex items-center justify-between bg-slate-800 p-4 text-white">
                <h1 className="text-3xl font-bold">
                    <Link to=".">Posts</Link>
                </h1>
                <p>{user.email}</p>
                <Form action="/logout" method="post">
                    <button
                        type="submit"
                        className="rounded bg-slate-600 py-2 px-4 text-blue-100 hover:bg-blue-500 active:bg-blue-600"
                    >
                        Logout
                    </button>
                </Form>
            </header>

            <main className="flex h-full bg-white">
                <div className="h-full w-80 border-r bg-gray-50">
                    <Link to="new" className="block p-4 text-xl text-blue-500">
                        + New Post
                    </Link>

                    <hr />

                    {data.posts.length === 0 ? (
                        <p className="p-4">No posts yet</p>
                    ) : (
                        <ol>
                            {data.posts.map((post) => (
                                <li key={post.id}>
                                    <NavLink
                                        className={({ isActive }) =>
                                            `block border-b p-4 text-xl ${isActive ? 'bg-white' : ''}`
                                        }
                                        to={post.id}
                                    >
                                        📝 {post.title}
                                    </NavLink>
                                </li>
                            ))}
                        </ol>
                    )}
                </div>

                <div className="flex-1 p-6">
                    <Outlet />
                </div>
            </main>
        </div>
    );
}
Restart your dev server and hit http://localhost:3000/posts, you should see something like this:
6. Build up the create post page
First add a function to /app/models/post.server.ts for creating a new post.
import type { Post } from '@prisma/client';

export function createPost({ body, title, userId }: Post & { userId: User['id'] }) {
    return getEnhancedPrisma(userId).post.create({
        data: { title, body },
    });
}
Add /app/routes/posts/new.tsx with the following content:
import type { ActionArgs } from '@remix-run/node';
import { json, redirect } from '@remix-run/node';
import { Form, useActionData } from '@remix-run/react';
import * as React from 'react';
import { createPost } from '~/models/post.server';

import { requireUserId } from '~/session.server';

export async function action({ request }: ActionArgs) {
    const userId = await requireUserId(request);

    const formData = await request.formData();
    const title = formData.get('title');
    const body = formData.get('body');

    if (typeof title !== 'string' || title.length === 0) {
        return json({ errors: { title: 'Title is required', body: null } }, { status: 400 });
    }

    if (typeof body !== 'string' || body.length === 0) {
        return json({ errors: { title: null, body: 'Body is required' } }, { status: 400 });
    }

    const post = await createPost({ title, body, userId });

    return redirect(`/posts/${post.id}`);
}

export default function NewPostPage() {
    const actionData = useActionData<typeof action>();
    const titleRef = React.useRef<HTMLInputElement>(null);
    const bodyRef = React.useRef<HTMLTextAreaElement>(null);

    React.useEffect(() => {
        if (actionData?.errors?.title) {
            titleRef.current?.focus();
        } else if (actionData?.errors?.body) {
            bodyRef.current?.focus();
        }
    }, [actionData]);

    return (
        <Form
            method="post"
            style={{
                display: 'flex',
                flexDirection: 'column',
                gap: 8,
                width: '100%',
            }}
        >
            <div>
                <label className="flex w-full flex-col gap-1">
                    <span>Title: </span>
                    <input
                        ref={titleRef}
                        name="title"
                        className="flex-1 rounded-md border-2 border-blue-500 px-3 text-lg leading-loose"
                        aria-invalid={actionData?.errors?.title ? true : undefined}
                        aria-errormessage={actionData?.errors?.title ? 'title-error' : undefined}
                    />
                </label>
                {actionData?.errors?.title && (
                    <div className="pt-1 text-red-700" id="title-error">
                        {actionData.errors.title}
                    </div>
                )}
            </div>

            <div>
                <label className="flex w-full flex-col gap-1">
                    <span>Body: </span>
                    <textarea
                        ref={bodyRef}
                        name="body"
                        rows={8}
                        className="w-full flex-1 rounded-md border-2 border-blue-500 py-2 px-3 text-lg leading-6"
                        aria-invalid={actionData?.errors?.body ? true : undefined}
                        aria-errormessage={actionData?.errors?.body ? 'body-error' : undefined}
                    />
                </label>
                {actionData?.errors?.body && (
                    <div className="pt-1 text-red-700" id="body-error">
                        {actionData.errors.body}
                    </div>
                )}
            </div>

            <div className="text-right">
                <button
                    type="submit"
                    className="rounded bg-blue-500 py-2 px-4 text-white hover:bg-blue-600 focus:bg-blue-400"
                >
                    Save
                </button>
            </div>
        </Form>
    );
}
7. Build up the post details page�
First add a few functions to /app/models/post.server.ts for manipulating a single post.
export function getPost({
    id,
    userId,
}: Pick<Post, 'id'> & {
    userId: User['id'];
}) {
    return getEnhancedPrisma(userId).post.findUnique({
        where: { id },
    });
}

export function deletePost({ id, userId }: Pick<Post, 'id'> & { userId: User['id'] }) {
    return getEnhancedPrisma(userId).post.delete({
        where: { id },
    });
}

export function publishPost({ id, userId }: Pick<Post, 'id'> & { userId: User['id'] }) {
    return getEnhancedPrisma(userId).post.update({
        where: { id },
        data: { published: true },
    });
}

export function unpublishPost({ id, userId }: Pick<Post, 'id'> & { userId: User['id'] }) {
    return getEnhancedPrisma(userId).post.update({
        where: { id },
        data: { published: false },
    });
}
Create /app/routes/posts/$postId.tsx with the following content:
import type { ActionArgs, LoaderArgs } from '@remix-run/node';
import { json, redirect } from '@remix-run/node';
import { Form, useCatch, useLoaderData } from '@remix-run/react';
import invariant from 'tiny-invariant';
import { deletePost, getPost, publishPost, unpublishPost } from '~/models/post.server';
import { requireUserId } from '~/session.server';
export async function loader({ request, params }: LoaderArgs) {
const userId = await requireUserId(request);
invariant(params.postId, 'await not found');
const post = await getPost({ userId, id: params.postId });
if (!post) {
throw new Response('Not Found', { status: 404 });
}
return json({ post });
}
export async function action({ request, params }: ActionArgs) {
const userId = await requireUserId(request);
invariant(params.postId, 'postId not found');
const intent = (await request.formData()).get('intent');
switch (intent) {
case 'delete':
await deletePost({ userId, id: params.postId });
return redirect('/posts');
case 'publish':
await publishPost({ userId, id: params.postId });
return null;
case 'unpublish':
await unpublishPost({ userId, id: params.postId });
return null;
}
}
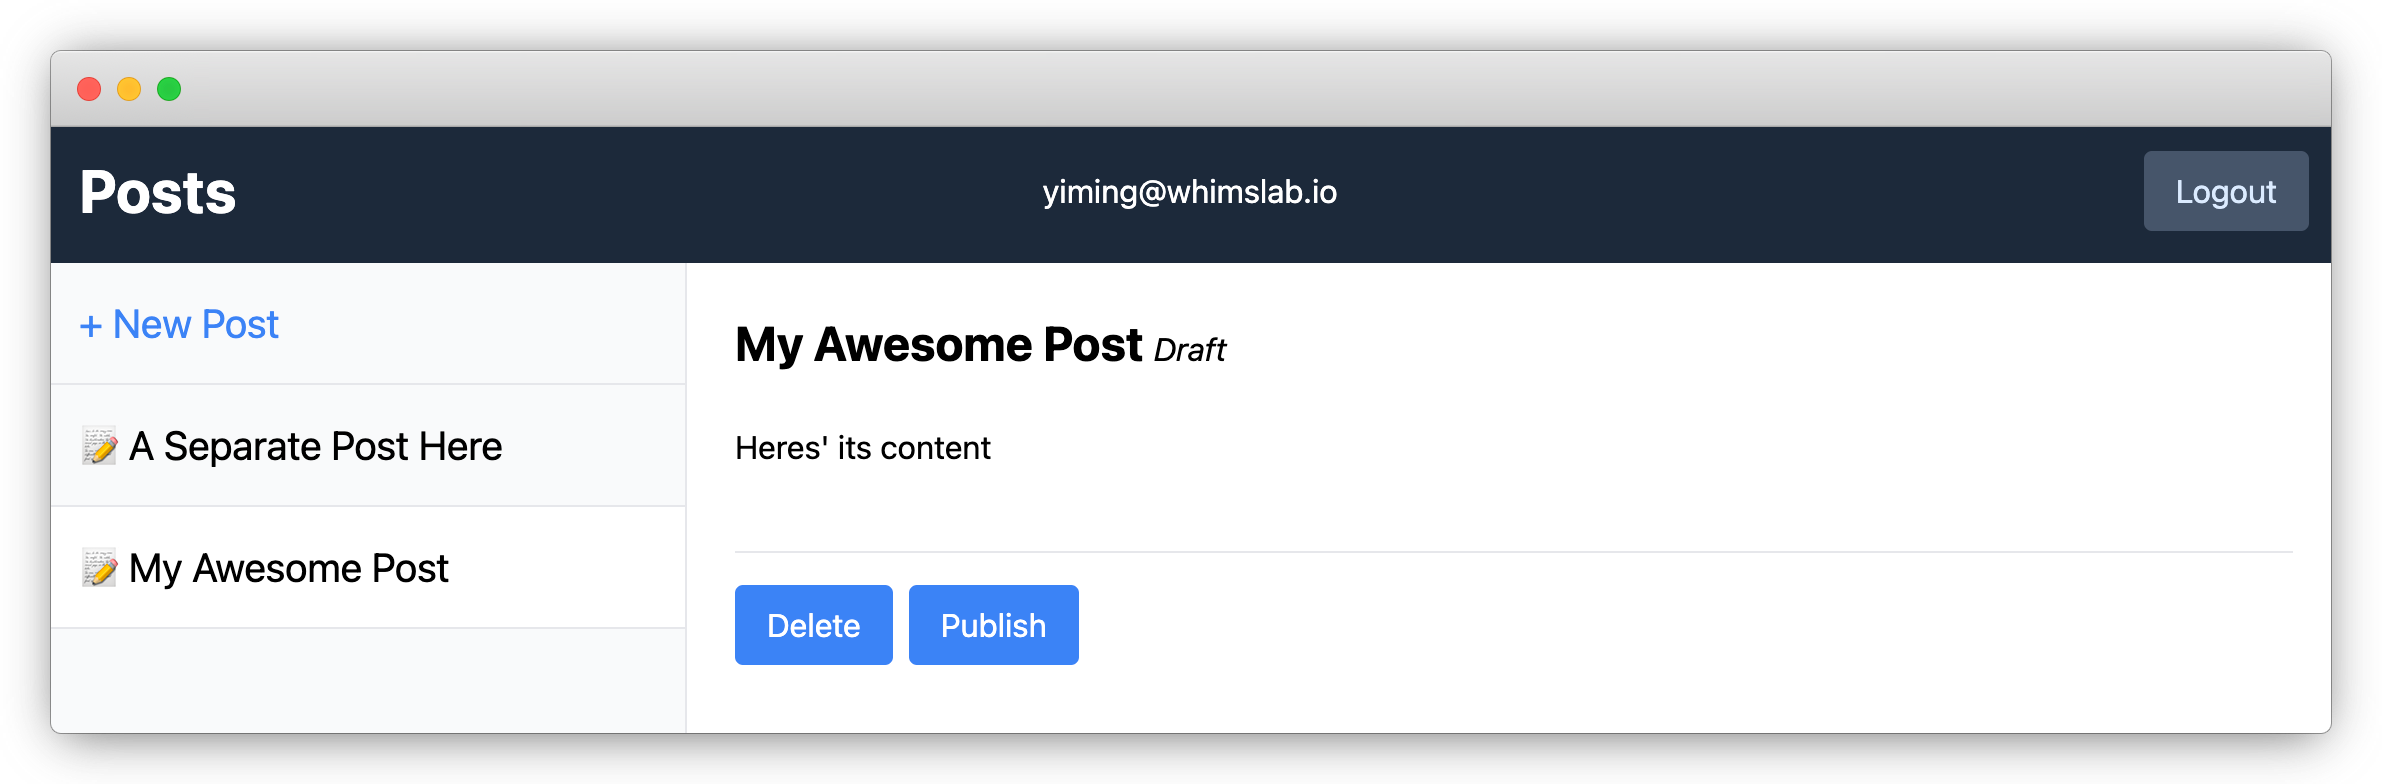
export default function PostDetailsPage() {
const data = useLoaderData<typeof loader>();
return (
<div>
<h3 className="text-2xl font-bold">
{data.post.title} {!data.post.published && <span className="text-base font-normal italic">Draft</span>}
</h3>
<p className="py-6">{data.post.body}</p>
<hr className="my-4" />
<div className="flex gap-2">
<Form method="post">
<input type="hidden" name="intent" value="delete" />
<button
type="submit"
className="rounded bg-blue-500 py-2 px-4 text-white hover:bg-blue-600 focus:bg-blue-400"
>
Delete
</button>
</Form>
<Form method="post">
<input type="hidden" name="intent" value={data.post.published ? 'unpublish' : 'publish'} />
<button
type="submit"
className="rounded bg-blue-500 py-2 px-4 text-white hover:bg-blue-600 focus:bg-blue-400"
>
{data.post.published ? 'Unpublish' : 'Publish'}
</button>
</Form>
</div>
</div>
);
}
export function ErrorBoundary({ error }: { error: Error }) {
console.error(error);
return <div>An unexpected error occurred: {error.message}</div>;
}
export function CatchBoundary() {
const caught = useCatch();
if (caught.status === 404) {
return <div>Post not found</div>;
}
throw new Error(`Unexpected caught response with status: ${caught.status}`);
}
Then, add /app/routes/posts/index.tsx to show default content when no post is selected:
import { Link } from '@remix-run/react';

export default function PostIndexPage() {
    return (
        <p>
            No post selected. Select a post on the left, or{' '}
            <Link to="new" className="text-blue-500 underline">
                create a new post.
            </Link>
        </p>
    );
}
Finally, update /app/routes/index.tsx to change the main link to our posts page:
<Link
    to="/posts"
    className="flex items-center justify-center rounded-md border border-transparent bg-white px-4 py-3 text-base font-medium text-yellow-700 shadow-sm hover:bg-yellow-50 sm:px-8"
>
    View Posts for {user.email}
</Link>
8. Test it out!
🎉 Congratulations! You've made a simple blogging app without manually implementing any access control logic. Now test it out and see if you can create posts and manage them.
Since we haven't hidden "Unpublish" and "Delete" buttons for posts not owned by the current user, you can still click them even for posts not owned to you, but it will end up with an error. Even if you forget to block certain actions from the frontend, our access control logic will still prevent them from happening.
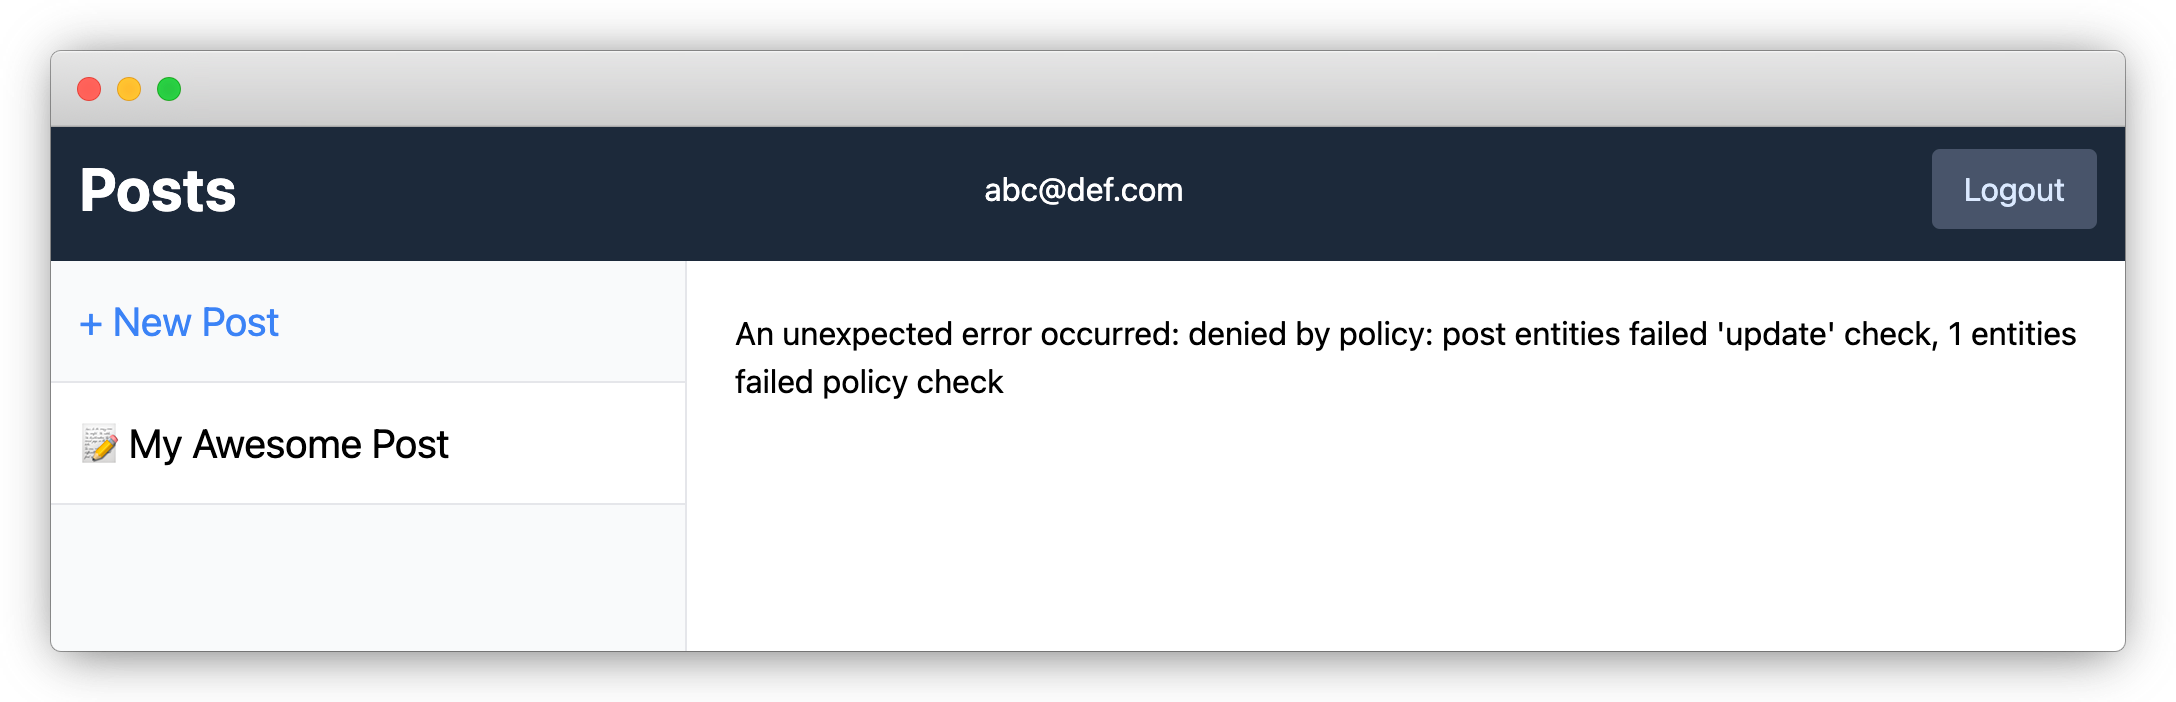
You can catch the error and render a nice message to the user.
Wrap up
If you have trouble following the building process, you can find the final result here. For more details about ZenStack, please refer to the Reference and Guides parts of the documentation.
Have fun building cool stuff 🚀!